jueves, 11 de diciembre de 2014

Very Deep CNN (19conv) first convolution filters 3D visualization

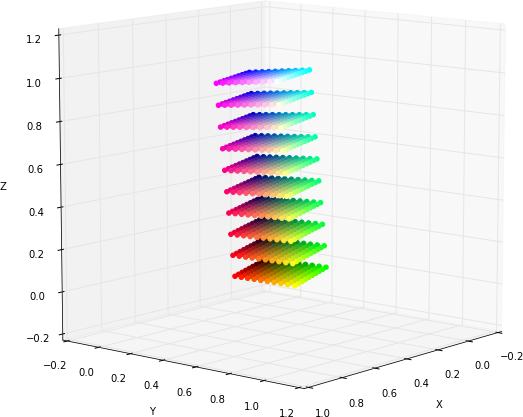
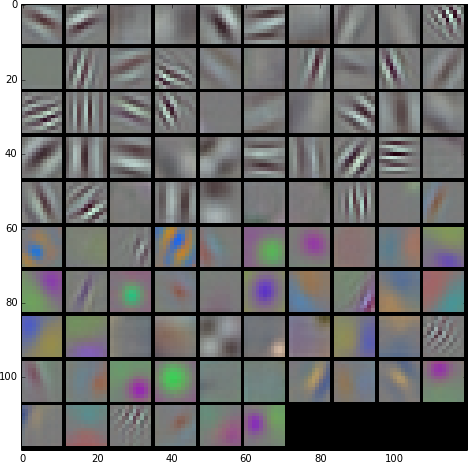
These are the filters of the first convolution layer of the very deep Convolutional Neural Network from Karen Simonyan and Andrew Zisserman available in the webpage www.robots.ox.ac.uk/~vgg/research/very_deep/ The authors have available an arXiv version of a paper in http://arxiv.org/abs/1409.1556

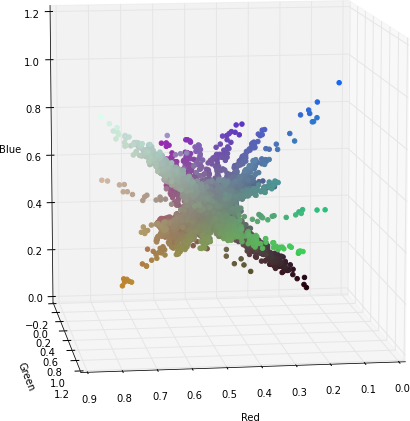
They got the 1st position for the localization task and the 2nd position in the classification task in ImageNet Challenge 2014. In order to get these results they evaluated different architectures with an increasing depth. This is the projection of the first convolutional layer filters in the RGB colorspace. Click on the images to see a 3D representation of the filters components.

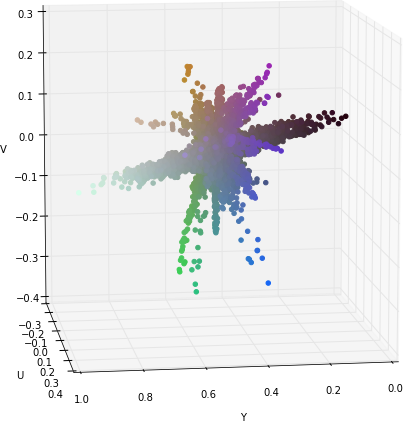
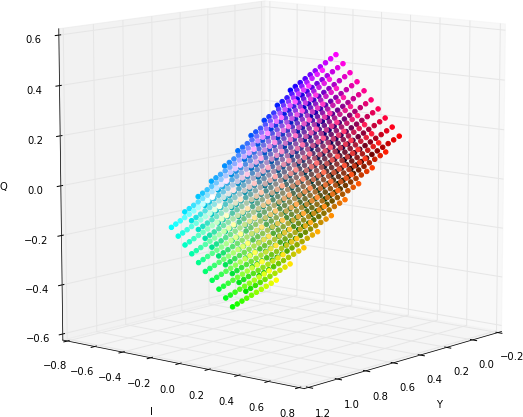
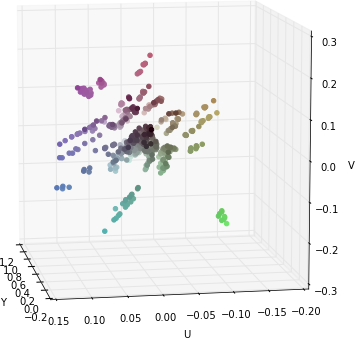
As in the Alexnet example we can do a linear transformation of the original RGB channels and visualize the same colors in the YUV colorspace. In this case the distribution of the points is not that clean and it seems that the distribution of the colours is more spread. This could be because the number of weights is very reduced 64x3x3x3 + 64 = 1792, compared to Alexnet 96x3x11x11 +96 = 34944.

If you find these interesting you can take a look at the results in my Master Thesis: webpage or the pdf and do not hesitate to ask me any question.
miércoles, 10 de diciembre de 2014

Alexnet first convolution filters 3D visualization

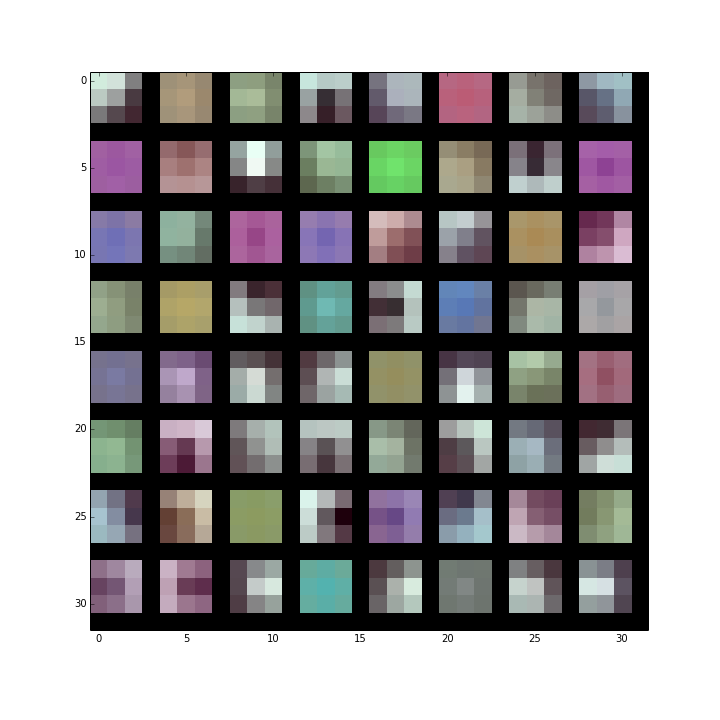
This are the filters of the first convolution layer of Alexnet network. If we look at them, they seem to be interested in luminance patterns (black-gray-white filters) and chrominance patterns (only the colour part without the black-gray-white component). This means that at the beginning the filters are specialized on this two typical situations and after that in the next convolution layer they could be appropriately merged.

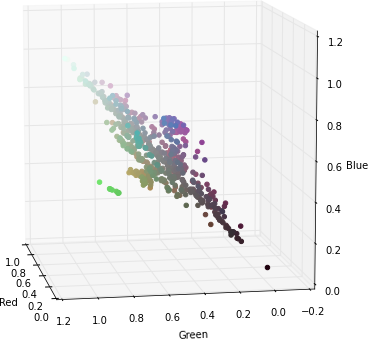
To illustrate that, this is the projection of each pixel of the filters (they are really weight vectors with three components red-green-blue). Click on the images to see a 3D representation of the filters components.

If we apply a transformation to YUV colorspace; also known as YCbCr for digital images. We can see that the Y component (luminance) nearly gets their own axis while UV components (chrominance) are strongly correlated but slightly uncorrelated with the Y component. This means that they could be separated without any problem when training a CNN.

If you find these interesting you can take a look at the results in my Master Thesis: webpage or the pdf and do not hesitate to ask me any question.
lunes, 1 de diciembre de 2014

Alexnet Graphviz visualization


Visualization of Alexnet using Graphviz. The example is a PNG as Blogger does not accept vectorial images like SVG or PDF. However, with the code below it is possible to generate a PDF calling the program "dot" with the next command:
dot -Tpdf alexnet.gv -o alexnet.pdf
# or an SVG
dot -Tsvg alexnet.gv -o alexnet.svg

alexnet.gv

// ================================================= //
// Author: Miquel Perello Nieto                      //
// Web:    www.perellonieto.com                      //
// Email:  miquel.perellonieto at aalto dot fi       //
// ================================================= //
//
// This is an example to create Alexnet Convolutional Neural Network
// using the opensource tool Graphviz.
//
// Tested with version:
//
//      2.36.0 (20140111.2315)
//
// To generate the graph as a PDF just run:
//
//      dot -Tpdf alexnet.gv -o alexnet.pdf
//
// One think to have in mind is that the order of the nodes definition modifies
// nodes position.

digraph Alexnet {
    // ================================== //
    //  GRAPH OPTIONS                     //
    // ================================== //

    // From Top to Bottom
    rankdir=TB;

    // Tittle possition: top
    labelloc="t";
    // Tittle
    label="Alexnet";

    // ================================== //
    //  NODE SHAPES                       //
    // ================================== //
    //
    // There is a shape and color description for each node
    // of the graph.
    //
    // It can be specified individually per node:
    //      first_node [shape=circle, color=blue];
    //
    // Or for a group of nodes if specified previously:
    //      node [shape=circle, color=blue];
    //      first_node;
    //      second_node;
    //

    // Data node
    // =========

    data [shape=box3d, color=black];

    // Label node
    // =========

    label [shape=tab, color=black];

    // Loss function node
    // ==================

    loss [shape=component, color=black];

    // Convolution nodes
    // =================
    //
    // All convolutions are a blue inverted trapezoid
    //

    node [shape=invtrapezium, fillcolor=lightblue, style=filled];
    conv1;
    conv3;
    // Splitted layer 2
    // ================
    //
    //  Layers with separated convolutions need to be in subgraphs
    //  This is because we want arrows from individual nodes but
    //  we want to consider all of them as a unique layer.
    //

    subgraph layer2 {
        // Convolution nodes
        //
        node [shape=invtrapezium, fillcolor=lightblue, style=filled];
        conv2_1;
        conv2_2;
        node [shape=Msquare, fillcolor=darkolivegreen2, style=filled];
        relu2_1;
        relu2_2;
    }

    // Splitted layer 4
    // ================
    //

    subgraph layer4 {
        // Convolution nodes
        //
        node [shape=invtrapezium, fillcolor=lightblue, style=filled];
        conv4_1;
        conv4_2;
        node [shape=Msquare, fillcolor=darkolivegreen2, style=filled];
        relu4_1;
        relu4_2;
    }

    // Splitted layer 5
    // ================
    //

    subgraph layer5 {
        // Convolution nodes
        //
        node [shape=invtrapezium, fillcolor=lightblue, style=filled];
        conv5_1;
        conv5_2;
        // Rectified Linear Unit nodes
        //
        node [shape=Msquare, fillcolor=darkolivegreen2, style=filled];
        relu5_1;
        relu5_2;
    }

    // Rectified Linear Unit nodes
    // ============================
    //
    // RELU nodes are green squares
    //

    node [shape=Msquare, fillcolor=darkolivegreen2, style=filled];
    relu1;
    relu3;
    relu6;
    relu7;

    // Pooling nodes
    // =============
    //
    // All pooling nodes are orange inverted triangles
    //

    node [shape=invtriangle, fillcolor=orange, style=filled];
    pool1;
    pool2;
    pool5;

    // Normalization nodes
    // ===================
    //
    // All normalization nodes are gray circles inside a bigger circle
    // (it reminds me a 3 dimmensional Gaussian looked from top)
    //

    node [shape=doublecircle, fillcolor=grey, style=filled];
    norm1;
    norm2;

    // Fully connected layers
    // ======================
    //
    // All fully connected layers are salmon circles
    //

    node [shape=circle, fillcolor=salmon, style=filled];
    fc6;
    fc7;
    fc8;

    // Drop Out nodes
    // ==============
    //
    // All DropOut nodes are purple octagons
    //

    node [shape=tripleoctagon, fillcolor=plum2, style=filled];
    drop6;
    drop7;

    // ================================== //
    //  ARROWS                            //
    // ================================== //
    //
    // There is a color and possible a label for each
    // arrow in the graph.
    // Also, some nodes has connections going in and
    // going out.
    //
    // The color can be specified individually per arrow:
    // first_node -> second_node [color=blue, style=bold,label="one to two"];
    //
    // Or for a group of nodes if specified previously:
    //  edge [color=blue];
    //  first_node -> second_node;
    //  second_node -> first_node;
    //  second_node -> third_node;
    //

    //
    // LAYER 1
    //

    data -> conv1 [color=lightblue, style=bold,label="out = 96, kernel = 11, stride = 4"];

    edge [color=darkolivegreen2];
    conv1 -> relu1;
    relu1 -> conv1;

    conv1 -> norm1 [color=grey, style=bold,label="local_size = 5, alpha = 0.0001, beta = 0.75"];
    norm1 -> pool1 [color=orange, style=bold,label="pool = MAX, kernel = 3, stride = 2"];

    pool1 -> conv2_1 [color=lightblue, style=bold,label="out = 256, kernel = 5, pad = 2"];
    pool1 -> conv2_2 [color=lightblue, style=bold];

    //
    // LAYER 2
    //

    edge [color=darkolivegreen2];
    conv2_1 -> relu2_1;
    conv2_2 -> relu2_2;
    relu2_1 -> conv2_1;
    relu2_2 -> conv2_2;

    conv2_1 -> norm2 [color=grey, style=bold,label="local_size = 5, alpha = 0.0001, beta = 0.75"];
    conv2_2 -> norm2 [color=grey, style=bold];
    norm2 -> pool2 [color=orange, style=bold,label="pool = MAX, kernel = 3, stride = 2"];

    pool2 -> conv3 [color=lightblue, style=bold,label="out = 384, kernel = 3, pad = 1"];

    //
    // LAYER 3
    //

    conv3 -> relu3 [color=darkolivegreen2];
    relu3 -> conv3 [color=darkolivegreen2];

    conv3 -> conv4_1 [color=lightblue, style=bold,label="out = 384, kernel = 3, pad = 1"];
    conv3 -> conv4_2 [color=lightblue, style=bold];

    //
    // LAYER 4
    //

    edge [color=darkolivegreen2];
    conv4_1 -> relu4_1;
    relu4_1 -> conv4_1;
    conv4_2 -> relu4_2;
    relu4_2 -> conv4_2;

    conv4_1 -> conv5_1 [color=lightblue, style=bold, label="out = 256, kernel = 3, pad = 1"];
    conv4_2 -> conv5_2 [color=lightblue, style=bold];

    //
    // LAYER 5
    //

    edge [color=darkolivegreen2];
    conv5_1 -> relu5_1;
    relu5_1 -> conv5_1;
    conv5_2 -> relu5_2;
    relu5_2 -> conv5_2;

    conv5_1 -> pool5 [color=orange, style=bold,label="pool = MAX, kernel = 3, stride = 2"];
    conv5_2 -> pool5 [color=orange, style=bold];

    pool5 -> fc6 [color=salmon, style=bold,label="out = 4096"];
    fc6 -> relu6 [color=darkolivegreen2];
    relu6 -> fc6 [color=darkolivegreen2];
    fc6 -> drop6 [color=plum2, style=bold,label="dropout_ratio = 0.5"];
    drop6 -> fc6 [color=plum2];

    //
    // LAYER 6
    //

    fc6 -> fc7 [color=salmon, style=bold,label="out = 4096"];

    //
    // LAYER 7
    //

    fc7 -> relu7 [color=darkolivegreen2];
    relu7 -> fc7 [color=darkolivegreen2];
    fc7 -> drop7 [color=plum2, style=bold,label="dropout_ratio = 0.5"];
    drop7 -> fc7 [color=plum2];

    fc7 -> fc8 [color=salmon, style=bold,label="out = 1000"];

    //
    // LAYER 8
    //

    edge [color=black]
    fc8 -> loss;
    label -> loss;
}

If you find these interesting you can take a look at the results in my Master Thesis: webpage or the pdf and do not hesitate to ask me any question.
Upper triangular matrix

Function to get the index of a matrix that is storing the upper triangular part of a square matrix.
I found this function in the bottom source, but I had to add the offset.

source: original function without offset

Function

In [1]:
def upper_triangular_index(n, r, c, k=0):
    """
    Returns the index of an array that is storing an
    upper triangular matrix. In this case the matrix
    has to be square and only accepts zero or possitive
    offsets.
    n = square matrix length
    r = actual row
    c = actual column
    k = diagonal possitive offset
    """
    return (n*r-k)+c-((r*(r+1))/2)-r*k

Some examples

In [2]:
import numpy as np
In [3]:
N = 3
keys = range(N)
matrix = np.ones((N,N), dtype=int)*-1

Small example without offset

In [4]:
offset=0
for key1 in keys:
    for key2 in keys:
        if key1+offset <= key2:
            matrix[key1,key2] = \
                upper_triangular_index(N, key1, 
                                       key2, k=offset)
print matrix
[[ 0  1  2]
 [-1  3  4]
 [-1 -1  5]]

Small example with offset = 1

In [5]:
matrix = np.ones((N,N), dtype=int)*-1
offset=1
for key1 in keys:
    for key2 in keys:
        if key1+offset <= key2:
            matrix[key1,key2] = \
                upper_triangular_index(N, key1, 
                                       key2, k=offset)
print matrix
[[-1  0  1]
 [-1 -1  2]
 [-1 -1 -1]]

Large example with offset = 3

In [6]:
N = 9
keys = range(N)
matrix = np.ones((N,N), dtype=int)*-1
In [7]:
offset=3
for key1 in keys:
    for key2 in keys:
        if key1+offset <= key2:
            matrix[key1,key2] = \
              upper_triangular_index(N, key1, 
                                     key2, k=offset)
print matrix
[[-1 -1 -1  0  1  2  3  4  5]
 [-1 -1 -1 -1  6  7  8  9 10]
 [-1 -1 -1 -1 -1 11 12 13 14]
 [-1 -1 -1 -1 -1 -1 15 16 17]
 [-1 -1 -1 -1 -1 -1 -1 18 19]
 [-1 -1 -1 -1 -1 -1 -1 -1 20]
 [-1 -1 -1 -1 -1 -1 -1 -1 -1]
 [-1 -1 -1 -1 -1 -1 -1 -1 -1]
 [-1 -1 -1 -1 -1 -1 -1 -1 -1]]

viernes, 28 de noviembre de 2014

3D visualization of some colorspaces

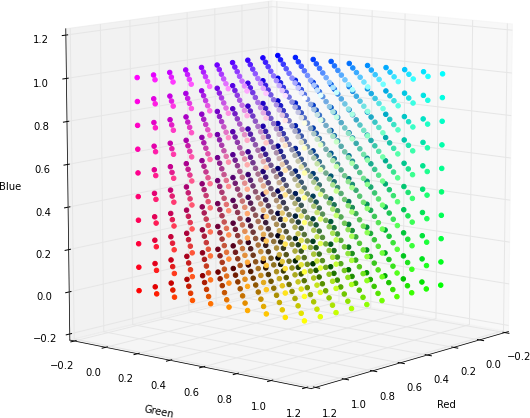
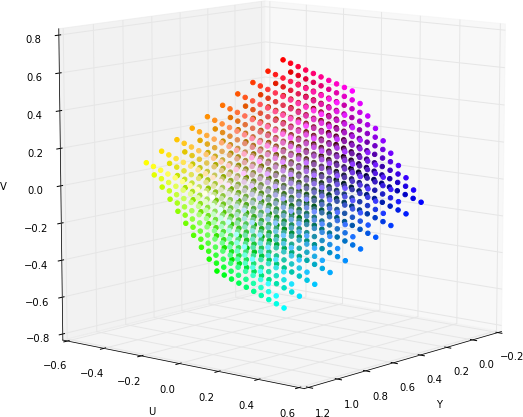
These are some GIF visualizations of an RGB cube in different colorspaces (Click in the images to see the 3D visualization, it can take some seconds to open as each visualization is about 11MB).

The original cube in the RGB colorspace:


RGB cube in the YUV colorspace:


RGB cube in the XYZ colorspace:


RGB cube in the YIQ colorspace:


If you find these interesting you can take a look at the results in my Master Thesis: webpage or the pdf and do not hesitate to ask me any question.
Perceptron training visualization

Visualization of a Perceptron trying to classify samples into two different categories.

 In this representation there is no bias involved,  the green arrow are the model weights and it defines an hyperplane orthogonal to them centred in the coordinates [0,0]. In each iteration the sample being tested is shown in orange. If the sample is in the wrong side of the hyperplane the vector representing the sample is shown, then the red vector is the same vector reescaled by the learning rate and it is summed to the weights vector. Then, the next sample is tested. 


martes, 2 de septiembre de 2014

Change aptitude upgrade folder

To change the default folder where temporal files are stored when doing an aptitude upgrade just create one folder /apt/partial in some specific place:

 mkdir -p /some/path/apt/partial 

And then modify or create the file /etc/apt/apt.conf and add this line:

 dir::cache::archives "/some/path/apt"; 

source : http://ostico.it/content/linux/aptitude/how-change-default-aptitude-download-directory

viernes, 1 de agosto de 2014

How to mount a remote directory over ssh on Linux

Directly copied from source: http://xmodulo.com/2013/04/how-to-mount-remote-directory-over-ssh-on-linux.html

Suppose you would like to mount a remote directory locally. However, you only have ssh access to the host where the remote directory resides, and there is no network file system (e.g., NFS, Samba) available to export the directory with. In this case, you can actually mount a remote directory over ssh, and access the directory via file system interfaces.
Mounting a remote folder over ssh is handled by FUSE kernel module, which allows one to create a virtual file system in user space. sshfs and gvfs are two such virtual file systems built on FUSE that allow one to mount a remote file system over ssh. In this post, I will show how to mount a remote directory over ssh with sshfs and gvfs.

Mount a remote directory over ssh with sshfs

To install sshfs on Ubuntu or Debian:
$ sudo apt-get install sshfs
To install sshfs on CentOS, RHEL or Fedora, first enable EPEL repository on your system, and then run the following.
$ sudo yum install sshfs
Next, if you want to use sshfs as a non-root user, you need to add the user to a group called fuse. That is:
$ sudo usermod -a -G fuse <user_name>
Run the following to make group membership change activated.
$ exec su -l $USER
Finally, you can mount a remote directory using sshfs as follows.
$ sshfs my_user@remote_host:/path/to/directory <local_mount_point>
The above command will ask you for ssh password for the remote host. Once you enter the password, a remote directory will become available at the local mount point. If you want to set up passwordless mounting, all you have to do is to set up passwordless ssh login to my_user@remote_host.
To unmount a ssh-mounted directory:
$ fusermount -u <local_mount_point>
If you would like to automatically mount over ssh upon boot, set up passwordless ssh login, and append the following in /etc/fstab.
$ sudo vi /etc/fstab

sshfs#my_user@remote_host:/path/to/directory <local_mount_point> fuse user 0 0

Vim automatic wrapping

If you need to automatically wrap your text in Vim to some specific text width you need to set just two different variables:

:set textwidth=80
:set formatoptions+=t

You can use a shorter name for both of these variables, tw and fo respectively.

Source: http://blog.ezyang.com/2010/03/vim-textwidth/

domingo, 22 de junio de 2014

Create a .gif from video

This command line should work but will generate a giant file:
ffmpeg -i yesbuddy.mov -pix_fmt rgb24 output.gif
Note that you probably want to reduce the frame rate and size when you convert, as well as specify a start time and duration. You probably do not want to convert the entire file at its original resolution and frame rate.
ffmpeg -ss 00:00:00.000 -i yesbuddy.mov -pix_fmt rgb24 -r 10 -s 320x240 -t 00:00:10.000 output.gif
The file size will still be huge. You may be able to use ImageMagick's GIF optimizer to reduce the size:
convert -layers Optimize output.gif output_optimized.gif


Source: http://superuser.com/a/436109

domingo, 8 de junio de 2014

Screenshot on Xfce4 using Imp Pant button

Xfce4 comes with one tool to take pictures of your actual window, this tool is xfce4-screenshooter. It has a prompt that let you select which window or region to capture, if you want your mouse to appear, and how many seconds of delay you want it to wait before taking the picture. It can be very useful, but the problem is assigning this tool to the "Imp Pant" button. In that case it will ask you to fill all this information. However, you can specify some of the options using some arguments, but still you need to specify the file-name in the prompt.

I found somebody asking for a functionality for not showing the prompt, but in the words of the developer it was done before without succes. (https://bugs.launchpad.net/ubuntu/+source/xfce4-screenshooter/+bug/585478)

In order to solve this problem I found in Archlinux wiki a very good explanation about different methods to take screenshots:

https://wiki.archlinux.org/index.php/Taking_a_screenshot

I really liked this method:

$ import -window root screenshot.jpg

Then I wanted to add this command to "Imp Pant" button, the problem is that it is not able to execute the inner command "date" in the same command line.

$ import -window root /home/maikel/screenshot/screenshot_`date +%F_%H%M%S`.png

For that reason you just need to create a small script that executes these lines:

#!/bin/bash
FOLDER=/home/maikel/screenshot
FILENAME=screenshot_`date +%F_%H%M%S`
import -window root ${FOLDER}/${FILENAME}.png

I created this script just open some editor and paste the above code (change the FOLDER and point to the desired one, make sure the folder exists, as I didn't want to make this script slower just by looking if the folder exists and creating it in case it doesn't.

vi /home/maikel/bin/screenshot

And added the execution flag

chmod u+x /home/maikel/bin/screenshot

The just open the keyboard settings

$ xfce4-keyboard-settings

go to application shortcuts


Click add buttom, and write the path to your script (in my case)

/home/maikel/bin/screenshot

Then just press OK and the desired button to assign this script : "Imp Pant"

Now you can just press the button "Imp Pant" and your shots will be saved in the specified folder.

jueves, 10 de abril de 2014

Activate windows without a product key


Fix Windows XP Activation Infinite Loop


1 - Start windows XP in safe mode with Comand Prompt
    - Boot the computer
    - Press F8 until the menu apears
    - Select : Safe Mode with Command Prompt
2 - In the command prompt write "explorer.exe" and hit Enter
3 - In the dialog box select "Yes"
4 - Go to "Start" and "Run"
5 - Type "rundll32.exe syssetup,SetupOobeBnk" and press OK
6 - Restart the computer

jueves, 3 de abril de 2014

Vim scheme in Tmux session

If the Vim scheme (or other programs) are not shown in a Tmux session, you just need to indicate to Tmux to use 256 colour palette. It can be done by calling Tmux with "-2" parameter, or setting the environment variable TERM appropriately.

The best option I found is adding an alias into your .bashrc (in case of bash shell) with the appropriate tmux call.

alias tmux="tmux -2"
This one seems to give same results for me:

alias tmux="TERM=screen-256color-bce tmux"

jueves, 27 de febrero de 2014

Dropbox need superuser

For some reason Dropbox started asking about superuser password... However it does not need acces to other folders than user ones. It seems that there is one problem with one of the paths in its python code. Just find the path to dropbox executable:

$ which dropbox
/usr/bin/dropbox

then modify with root privileges this file.

sudo vi /usr/bin/dropbox

The incorrect line is the first of these two lines:
PARENT_DIR = os.path.expanduser("/var/lib/dropbox")
DROPBOXD_PATH = "%s/.dropbox-dist/dropboxd" % PARENT_DIR

In my case the first one needs to point to my home, then it looks like this:

PARENT_DIR = os.path.expanduser("~")

Then start dropbox

$ dropbox start -i

source: http://blog.ishans.info/2013/12/26/fixing-authentication-is-needed-to-run-usrbindropbox-as-the-super-user-error-in-linux/

miércoles, 26 de febrero de 2014

Window tiling on Ubuntu 12

To configure tiling shortcuts on Ubuntu 12

Open the CompizConfig Settings manager
$ ccsm
filter the word "grid"
Select the result
Configure the different options

source: http://askubuntu.com/questions/334559/how-can-i-setup-hotkeys-for-tiling-individual-windows-in-unity-ubuntu-12-04

ALT+TAB not switching windows

Ubuntu 12.04.4 LTS

if the key combination ALT+TAB does not switch windows it may be disable in Compiz.
In order to enable it again try these steps:

# Open CompizConfig setting manager
$ ccsm

Then go to the tab Window management
and check application switcher